Integrating CVS Version Control with Netbeans® Java IDE
So, like any good cheap engineer trying to write decent Java code with some configuration
control added in, I took a look at the open source Netbeans® IDE. Being very happy with the IDE's features, I started exploring what else I might be able to make it do ... and quickly
found out that it could support integrated version control via a CVS back-end, which I already had setup on my Linux server. I was using the Netbeans® IDE on my main Windows® workstation. Sadly, I didn't really find what I'd call great documentation on how to do this. In particular, there were a couple non-obvious hurdles I had to get over to make this work. Since I didn't find them in any of the many howto pages I used to start this integration, I decided to write my own to fill in some of the details.
Of course, with all howtos, I assume no responsibility for anything bad that happens if you follow the advice contained in these documents. I'm merely trying to be helpful, by conveying what worked for me. By implementing my advice, you are implicitly accepting this disclaimer. Comments are appreciated, though.
My Configuration
First, I used the
Netbeans® 3.5.1 IDE for Windows® 2000
cygwin for Windows® (for cvs.exe and ssh.exe)
CVS 1.11 on Linux (SuSE 8.1 kernel 2.4.19 and 2.4.21)
collette:/ # rpm --query cvs
cvs-1.11.1p1-235
Then, I used the
Netbeans® 4.0 IDE for Windows® XP
PuTTY 0.58 for XP (plink.exe, in lieu of ssh.exe)
CVSNT 2.0.51d for XP (for cvs.exe)
CVS 1.11 on Linux (SuSE 8.1 kernel 2.4.21)
collette:/ # rpm --query cvs
cvs-1.11.1p1-334
The Steps
1) First, install Netbeans® and CVS. I'm not going to explain this, but just assume that
you have them working separately and just need to integrate them.
2) My installation help is specific to CVS on a Un*x server. To do it this way, you
will also need to be able to execute remote commands on the server from your Windows®
box. You basically have two choices (at least). You can do things relatively insecurely,
by using rsh to remotely login to the server and execute cvs commands. Or, you can do
as I did and securely execute remote commands by using ssh to replace rsh. This is what
I'll describe. So, this step is to make sure you have an account that you can ssh (or rsh)
into on the server.
3) You will then need to make sure you have things setup so that you can login from client
(where Netbeans® is) to server (where CVS back-end is) without being prompted for a
password. Every time you invoke a CVS action thru the Netbeans® IDE, it's going to need to
authenticate itself to the ssh server. You don't want to be prompted for passwords every
time this happens. This action is beyond the scope of my howto. Search the web for
descriptions of SSH Public Key Authentication. Just because I'm a nice guy, I'll give a quick
summary here:
3a) First, on the client machine, you need a command line ssh client. I choose to use the one
that comes with the Cygwin package (I installed all of cygwin on my Windows® machine). I'm
sure others will do just fine as well. PuTTY's plink.exe will also work.
3b) Then, make sure you have a user identity and home directory on the Windows® cygwin
drive (folder). I just made one that matched my Linux account name, but that shouldn't be
necessary.
3c) Then, in your cygwin shell, you need to create a new private key to have Netbeans® use to
authenticate you to the CVS server. I believe you do this with
ssh-keygen, or something likethat. This should give you a
/home/username/.ssh directory on your cygwin virtual drive (e.g. C:\cygwin\home\username\.ssh).
3d) Also, the ssh-keygen command will create a key in the .ssh directory. The public part of
that key will be named id_rsa.pub if you made a RSA key, which I did. You need to copy
the text of this file into a file on your CVS server box called:
/home/linux_username/.ssh/authorized_keysThis tells the ssh daemon on the CVS box to automatically accept logins from any client
who shows a public key that matches this one. Make sure you understand the security
implications of allowing automated logins without passwords/passphrases. I don't love the concept,
but if you take care to secure your network (where you keep the keys you made), then it's
not a huge risk.
3e) Now, from the client cygwin shell, you should be able to invoke:
ssh linux_username@linux_host
and be granted access without password prompts. If this doesn't work, then probably publickey authentication hasn't been turned on in your server's sshd config file. But this is the
problem for another howto, so use Google if it's not working.
At this point, if you are using Netbeans® 4.0 (or beyond?) please follow the instructions on this page as the steps diverge significantly.
4) Ok, aside complete. Now that remote logins are automated, it's time to setup Netbeans®.
Create a new project in Netbeans®, with no Filesystems mapped. You are then going to
use the Mount action (in the IDE) and instead of selecting a Filesystem, you select a Version
Control (CVS) mount target. First, you have to choose the mount point from wherever
your CVS working directory is. For me, I keep my working files on the Linux server. Then,
I use Samba to map them into my win2000 explorer windows. If you are going to do this,
which is fine, then you need to actually map a drive letter to your Linux directory. Just using
\\server\share
notation to refer to your drives won't work for this kind of thing. It will cause problems later.So, do something like map the W: drive to your server's /home/user directory, whatever that
may be for your account. Then, when Netbeans® asks you for the location of the CVS
working directory to mount, you can say something like this:
W:\cvs_working\projects\current_project
5) Then, you should see a menu like this:
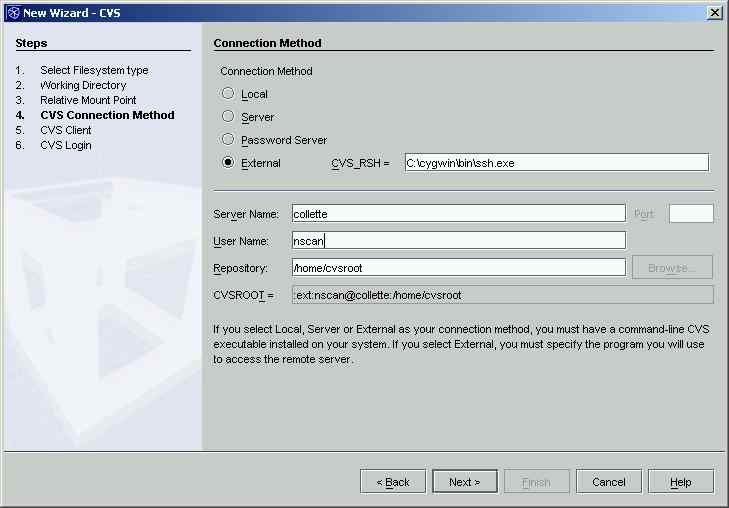
You need to specify the win command line to use for your command-line ssh client. If you are feeling
insecure, and decided to use RSH instead of SSH, then here you would enter the RSH executable. Also
specify the server name, the username for your Un*x box, and the location of the cvs database (a.k.a.
$CVS_ROOT). Click Next.
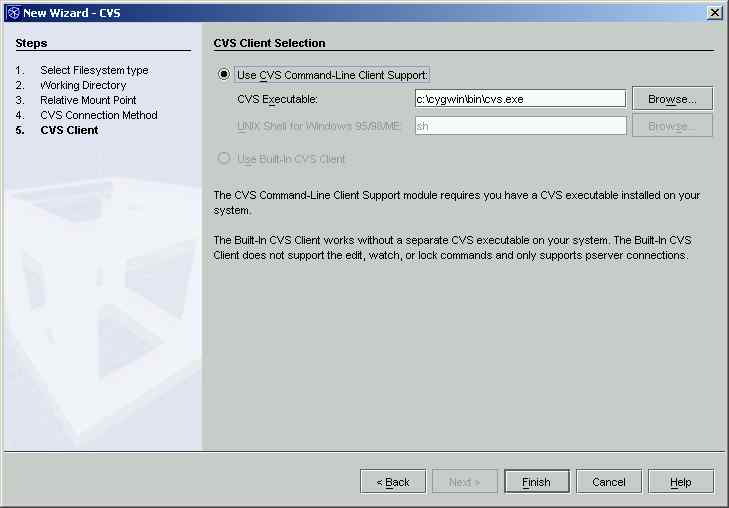
6) Next, you get prompted for the cvs client installation. Again, this need to be a command line cvs client,
which also conveniently comes with cygwin. So, I just point to another executable in the same cygwin
bin directory. Click Finish.
7) Wouldn't it be great if you were done? I think that was the intention, but in the Netbeans® 3.5.1 IDE I
used, there are a couple more "things" (a.k.a. hacks) you need to do. First, you need to overcome some
errors in the default Netbeans® scripted commands, that were clearly written by Un*x folks. The IDE will use the
win command line tool "cmd" to invoke the cvs and ssh executables you told it about. The problem is that you
probably have the IDE installed on the C: drive, and your working files are on the W: drive. The stupid
command line you get in Windows® doesn't let you do this:
    cd W:

    dir *
and expect to see the contents of W:. You will get the contents of the drive you were in before you typed 'cd W:'. What you need to do to change drives is to type:
W:
Then, your subsequent command have a shot of working. So, to make this happen, you need to append some
text to the built-in Netbeans® script commands. I will complement the Netbeans® guys on letting you modify these
commands. Otherwise, something like this wouldn't be fixable until you reported a bug, and got a new version.
So, to fix the script command definitions, you need to right-click on each of the CVS mounts you created (if there are
more than one) and select Customize, and then go to the Advanced tab. You can then select the button to
Edit Variables. Here, you need to edit the QUOTE, RUNCDW, and RUNCDM variables. What you need
to do is insert
W: &&
into the command string, immediately after the first quotes, to give you something like this:
cmd /X /C "W: && ${CD} ${QUOTE}${ROOTDIR}${PS}${MODULE}${PS}.${QUOTE}&&
instead of this:
cmd /X /C "${CD} ${QUOTE}${ROOTDIR}${PS}${MODULE}${PS}.${QUOTE}&&
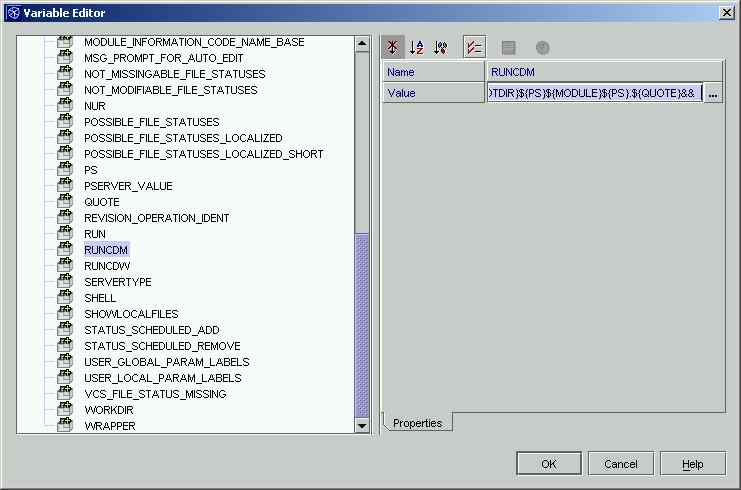
Do that for both RUNCDM and RUNCDW. Then, change the QUOTE definition from whatever it is to just
plain <space>. Not <-s-p-a-c-e->, but just . Dammit, I can't just type a space. Anyway, you get the idea.
8) The next step might be something you don't run into, but I did. After the last step, try right clicking on one
of your CVS mount points and invoking a CVS command, like CVS Refresh. If it works, then forget this step.
If it hangs, then read on. You can tell if it works because the IDE (below the top toolbar) will have a text message
like "Command Refresh finished." or "Command Refresh running ... " or "Command Refresh Failed."
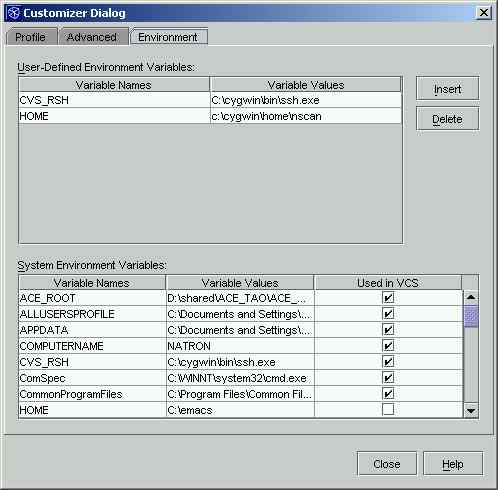
The problem is with using ssh to login. The ssh client has to know who it's logging in as (the person who
created the public key authentication stuff I mentioned above). I believe it does this by checking the HOME
environment variable. If you right-click in the IDE on your CVS mount, and select Customize, you can choose
the Environment tab. In my default configuration, I had HOME assigned below to C:\emacs. This was not
right. So, I had to uncheck the "Used In CVS" box next to that definition, and then create a new User-
Defined Environment Variable in the top part of the dialog window. I assigned that to the home location of
my cygwin user, which is where the .ssh directory should be that holds your ssh keys. See my final settings:
9) After that is done, you should be ready to go!! Unfortunately, it looks like this process is needed
for each CVS mount in each project. Maybe a Netbeans® guru would know how to change your IDE
defaults to always apply these fixes, but I don't. Anyway, you're usually not creating tons of
projects and tons of mount points, so I don't think this is to big of a problem.
Good luck, and send comments if you like.
|
Home |
|
Intro |
|
Services |
|
traffic |
|
Knowledge |
|
blog |
answers
 |
|
howtos (old) |
|
essays (old) |
|
Download |
|
apps |
|
secure
|
|
About |
|
skills |
|
experience |
resume(old) 
|
|
other links |
|
corporate info |
|
Contact |
email keys

|
| Client Access |
Print-Friendly 
|
