Windows® File Sharing with SSH VPN
Of course, with all howtos, I assume no responsibility for anything bad that happens if you
follow the advice contained in these documents. I'm merely trying to be helpful, by conveying
what worked for me. By implementing my advice, you are implicitly accepting this disclaimer.
Comments are appreciated, though.
I started this effort when I realized that my ISP and/or router would not support the kind
of virtual private network (VPN) I was hoping to create (PPTP or IPSec). However, it
was nice to learn that SSH, which I used everyday anyway, could be used to tunnel most
types of TCP/IP applications securely, and thus create kind of a poor-man's VPN with
tunnels setup on an app-by-app basis.
Anyway, to summarize, the concept is that you only open up one port on the firewall that
hides your private network (home, work, whatever). That typically is port 22, the ssh port.
Via this port, you can connect to your ssh server (daemon) from anywhere on the internet,
and then tunnel non-port 22 traffic thru the connection you already have established to port
22, which happens to be encrypted. Any application you would normally connect via port
X on server Y now connects to port X (usually) on your roaming machine, via the interface
name 'localhost'. This localhost:X socket is actually tunneled thru the SSH connection to
the other side of the firewall, where it is ultimately routed through your server's localhost
interface, to the actual Y:X endpoint. Your SSH software handles the multiplexing of this
data, with the normal remote terminal SSH data, or whatever else is tunneled.
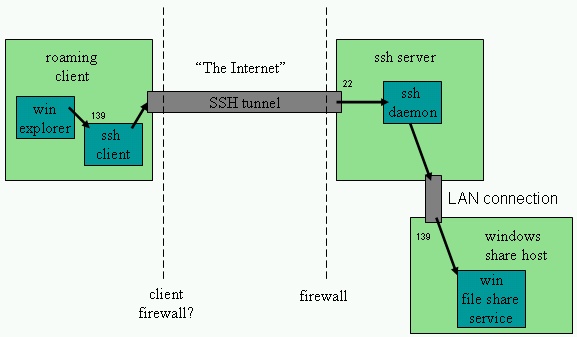
Figure 1. SMB over SSH tunnel (X = port 139, Y = ssh server global hostname)
Most applications that satisfy the following criteria,
2) the server is listening on a fixed, well-known port
3) the application (server) isn't trying to do any kind of client hostname
authentication that might get confused by tunneling
seemed to work pretty easily with this scheme.
I have only one qualifying comment on this, before I explain how I used this technique with file
sharing via the Windows® SMB protocol.
With some applications (I think it might have been mail service tunneling with postfix), the
tunnel connection was not being accepted if I specified the tunnel hostname as
localhost
This had to do with the fact that my Linux box had both IPv4 ("normal" IP) and IPv6 (experimental)
installed. It first tried to connect to 'localhost' via the IPv6 interface, which was not configured
correctly. Instead of retrying the connection via the standard 127.0.0.1 IPv4 interface, it aborted
after the first failed attempt. The solution was to specify my SSH tunnel endpoints with 127.0.0.1
as the explicit hostname/IP, instead of 'localhost'. If this explaination didn't make sense, read the
rest of the howto first, then it will.
Basic Setup for SSH Tunneling
1) make sure you have an ssh daemon on your server inside your firewall, and a client (not PuTTY)
on your roaming machine that you can use to remotely login to the server with.
2) in your server's sshd_config file, enable the following things (both may not be absolutely necessary,
but I'm not fiddling with every setting just to write this howto).
AllowTcpForwarding yes
GatewayPorts yes
3) setup the actual tunnels in the config settings for your ssh client. I'll show some examples for
the SSH.com client:

now, the specific steps to tunnel Windows® shares ....
1) un-install File and Printer Sharing in the Windows® Networking Properties for your networking
adapter on the roaming machine. You have to uninstall it, not just disable it. You do not have to
turn off netbios over TCP in the Advanced Properties page. In fact, I don't think you can. Don't
worry about the fact that you see a listening port 139 (netbios-ssn) unless you disable Netbios-
over-TCP. Just don't, ok.
2) if you want to be able to refer to your samba remote host by name (rather than 127.0.0.1),
edit LMHOSTS to add a line like this:
127.0.0.1 sambashare
This isn't necessary, but makes things a little more aesthetic. Then, make sure that in the TCP/IP
properties for your network adapter, you have 'Enable LMHOSTS lookup' checked.
Once this is done, start the tunnel by logging in to your ssh server via the ssh client. You can verify
that the tunnel is open by opening a command prompt on the roaming client and typing:
>netstat -a
and you should see a listening port on the netbios-ssn port (139).
If you further want to debug before trying file sharing, then type:
telnet 127.0.0.1 139
if this doesn't fail, then things look good. Essentially you should get an open connection that shows
you nothing (but doesn't reject the connection). From within your SSH client window (connected
to the ssh server), you can then type:
>netstat -tand verify that there is now a connection to the netbios-ssn port.
SSH Tunneling SMB Traffic Problems
Unfortunately, I found that tunneling Windows® SMB traffic was harder than other applications. None
of the howtos explained this, which is the only reason I've written this down. The two primary issues
were:
separate port (138, I think) is used for UDP (broadcast datagram) traffic that allows clients
to browse the network for netbios (Windows® share) hostnames and shared folders. This is
just a limitation, so don't expect to get it to work. It just means you have to know the shared
folders exact names you're trying to map to ... they won't show up in a browser.
2) the original SSH client I used (PuTTY) has a bug (yes, Simon, it's a bug) that won't allow it
to tunnel SMB port 139 traffic. So, for me, switching to SSH.com's client (the non-
commercial version which is just as free as PuTTY) was needed. Here is a link to the
discussion of the PuTTY bug. At the time I wrote this (Dec 2003), the latest versions of
PuTTY were still not handling this, so I gave up on it.
My Setup
I always hate when people write howtos and neglect to mention exactly what configuration they got to
work, as if all versions of Linux, every Apache distribution, or every SSH client was the same.
SSH Server: openSSH sshd
SSH Client: SSH.com non-commercial SSH client 3.2.9 for Windows®
server OS: SuSE Linux 8.1 (2.4.21-151 kernel)
client OS: WinXP SP1
firewall: Belkin 4-port NAT Router/Firewall
ISP: comcast@home
collette:/home/nscan # rpm --query openssh
openssh-3.4p1-215
collette:/home/nscan # rpm --query samba
samba-2.2.5-178
collette:/home/nscan # uname
Linux
collette:/home/nscan # uname -r
2.4.21-151-default
collette:/home/nscan #
And here are even links to my config files, with certain sections removed for security reasons:
/etc/samba/smb.conf
/etc/ssh/sshd_config
|
Home |
|
Intro |
|
Services |
|
traffic |
|
Knowledge |
|
blog |
answers
 |
|
howtos (old) |
|
essays (old) |
|
Download |
|
apps |
|
secure
|
|
About |
|
skills |
|
experience |
resume(old) 
|
|
other links |
|
corporate info |
|
Contact |
email keys

|
| Client Access |
Print-Friendly 
|
